A Query in Time - Introduction to SQL Server Temporal Tables
Andrew Moscardino | March 1st, 2021

When designing a database schema, versioning tends to be a problem. There are many considerations and things that can go wrong. You have to figure out how to create the historical records, preferably automatically. You must figure out how to query normal records and historical records together and separately. You need to determine how you want to handle rollbacks. Not to mention the extra hassle of adding versioning to an existing schema.
Luckily for us, SQL Server has a feature that can solve many of these problems for us: temporal tables.
Temporal Tables?
Microsoft’s documentation does a pretty good job at summarizing what temporal tables are:
SQL Server 2016 introduced support for temporal tables (also known as system-versioned temporal tables) as a database feature that brings built-in support for providing information about data stored in the table at any point in time rather than only the data that is correct at the current moment in time. Temporal is a database feature that was introduced in ANSI SQL 2011.
The key emphasis here is that temporal tables let you query a table in time. Additionally, temporal tables are “system-versioned” which means you don’t need to worry about manually managing versions, and that it is actually a standard ANSI SQL feature so it’s also supported in other database systems. We will be focusing on SQL Server in this post, but these concepts should transfer.
When a temporal table is created in SQL Server, a history table is created behind the scenes. The main table contains the records as they exist at the current point in time and the history table contains all the previous versions of records. You can query the main table as normal or add temporal clauses to your query to find historical records.
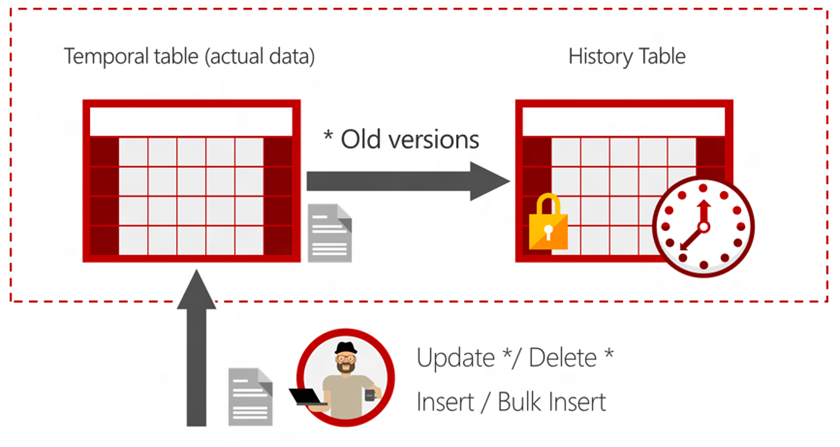
Diagram showing how old versions of records are automatically saved by SQL Server.
Creating a Temporal Table
First let’s consider a normal table that we can use as our sample main table. For this post, we’ll work with a basic person record:
create table dbo.Person
(
    [PersonId] int not null primary key clustered,
    [Name] nvarchar(max) not null,
    [Email] nvarchar(max) null,
    [Address] nvarchar(max) null,
    [PhoneNumber] nvarchar(max) null
)
That table is not temporal, but having the normal definition to compare it to will highlight what we need to make it temporal:
create table dbo.Person
(
    [PersonId] int not null primary key clustered identity(1,1),
    [Name] nvarchar(max) not null,
    [Email] nvarchar(max) null,
    [Address] nvarchar(max) null,
    [PhoneNumber] nvarchar(max) null,

    [SysStartTime] datetime2 generated always as row start hidden not null,
    [SysEndTime] datetime2 generated always as row end hidden not null,
    Period for system_time (SysStartTime, SysEndTime)
)
with (system_versioning = on (history_table = Person_History))
There are two main changes. First, we added SysStartTime and SysEndTime as generated columns then used that to create the Period column. These are required columns for temporal tables. Making the start and end time columns hidden is optional, but can help to hide the versioning when it’s not needed. Second, we added with (system_versioning = on (...)) to the end of the statement. This will create the history table using the Period column defined above. The default naming for the history table is kind of messy, so we also defined what the table should be called. I like the _History suffix, so that’s what we will use here.
SQL Server Management Studio helpfully tells us that the table is now system versioned and nests the history table under the main table:
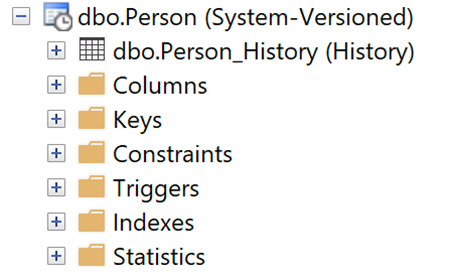
SSMS Object Explorer showing the Person table and its nested history table.
Now that we have a history table created, we can insert, update, and delete data in the Person table as we normally would. SQL Server will keep the history table updated behind the scenes.
Making an Existing Table a Temporal Table
Turning a normal table into a temporal table is quite straightforward. Let’s start with our normal table definition, add the necessary columns, then enable versioning:
create table dbo.Person
(
    [PersonId] int not null primary key clustered identity(1,1),
    [Name] nvarchar(max) not null,
    [Email] nvarchar(max) null,
    [Address] nvarchar(max) null,
    [PhoneNumber] nvarchar(max) null
)
go

alter table dbo.Person
    add [SysStartTime] datetime2 generated always as row start hidden not null
            constraint DF_SysStart default sysutcdatetime(),
        [SysEndTime] datetime2 generated always as row end hidden not null
            constraint DF_SysEnd default convert(datetime2, '9999-12-31 23:59:59.9999999'),
        Period for system_time (SysStartTime, SysEndTime)
go

alter table dbo.Person set (system_versioning = on (history_table = dbo.Person_History))
go
You can see that enabling versioning is much the same as creating the table with versioning enabled.
You can also use alter table <TableName> set (system_versioning = off) to disable versioning on a table. This will leave the history table as a normal table, which you can then drop if you want to remove versioning altogether.
Modifying Data in Temporal Tables
There isn’t really any special considerations you need to insert, update, or delete records from a temporal table. Performing those actions will cause new records to be created in the history table automatically.
You cannot (and should not) modify the data in the history table, and if the Period columns are hidden, which they don’t actually have to be, then any existing queries and statements will work normally. You can even alter the schema of the main table and the history table will be updated to match automatically.
Let’s run some statements to add some data to our history table:
insert into Person (Name, Email, Address, PhoneNumber) values ('Jeff Winger', '[email protected]', '1233 Main St', '555-555-5555')
insert into Person (Name, Email, Address, PhoneNumber) values ('Abed Nadir', '[email protected]', '55 W East Rd', '555-555-5555')
insert into Person (Name, Email, Address, PhoneNumber) values ('Shirley Bennet', '[email protected]', '809 E South Ave', '555-555-5555')
insert into Person (Name, Email, Address, PhoneNumber) values ('Troy Barnes', '[email protected]', '55 W East Rd', '555-555-5555')
insert into Person (Name, Email, Address, PhoneNumber) values ('Annie Edison', '[email protected]', '55 W East Rd', '555-555-5555')
insert into Person (Name, Email, Address, PhoneNumber) values ('Pierce Hawthorne', '[email protected]', '123 N Fake Blvd', '555-555-5555')
insert into Person (Name, Email, Address, PhoneNumber) values ('Britta Perry', '[email protected]', '9985 Main St', '555-555-5555')
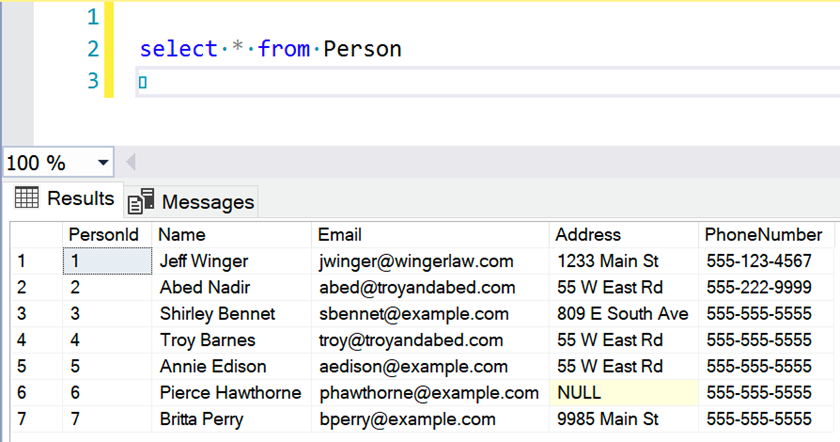
And now let’s see how our table looks:

SSMS Query showing results after first insert statements.
Notice that the history-specific columns are hidden. When dealing with the main table, we don’t need to deal with them at all. Now let’s update some records so we can start to play with the history table:
update Person set PhoneNumber = '555-123-4567' where PersonId = 1
update Person set Email = '[email protected]' where PersonId = 1
update Person set PhoneNumber = '555-999-2222' where PersonId = 2
update Person set Address = null where PersonId = 6
-- Pause for a few minutes to make later queries easier.
update Person set Email = '[email protected]' where PersonId = 4
-- Pause for a few minutes to make later queries easier.
update Person set PhoneNumber = '555-222-9999' where PersonId = 2
update Person set Email = '[email protected]' where PersonId = 2
update Person set Email = '[email protected]' where PersonId = 4
-- Pause for a few minutes to make later queries easier.
insert into Person (Name) values ('Ben Chang')
-- Pause for a few minutes to make later queries easier.
delete from Person where PersonId = 8
SSMS Query showing results after some update statements.
Querying Temporal Tables
There are two main ways to query the history table. The first is looking at previous versions of the table by adding time-based clauses to your queries. The second is to look into the history table manually, which lets you see all the previous versions of records.
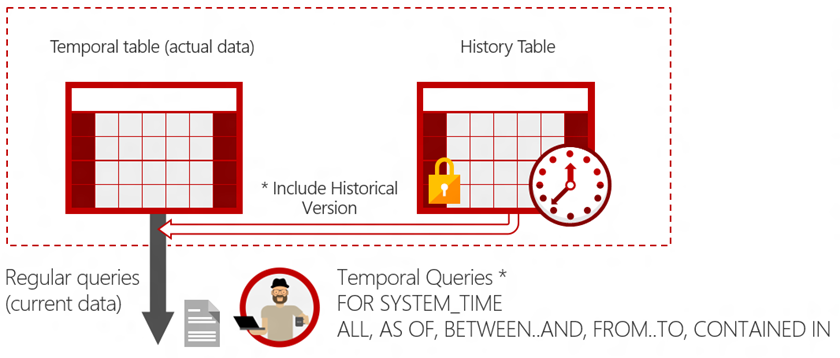
Diagram showing how SQL Server combines data from the main table and the history table when using a temporal clause in a query.
Querying by Time
Time-based causes can be added to otherwise normal queries to use the saved versions. This allows you to do things like see what a table looked like at a certain point in time or to see what the records looked like during a particular time range.
You add these clauses using for system_time <clause> where the clause can be one of:
- as of <datetime>
- from <datetime> to <datetime>
- between <datetime> and <datetime>
- contained in (<datetime>, <datetime>)
- all
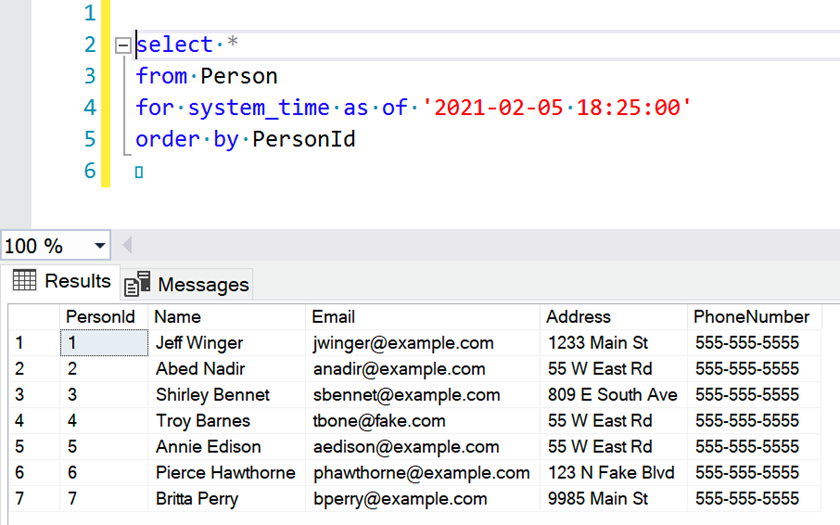
Using these, you can “time travel” on your table. Let’s see some examples. The as of query gets the records as they existed at a point in time:
select *
from Person
for system_time as of '2021-02-05 18:25:00'
order by PersonId
That query returns the original table contents (the datetime used here is approximately a minute after my first inserts).
Screenshot showing the “as of” query and results.
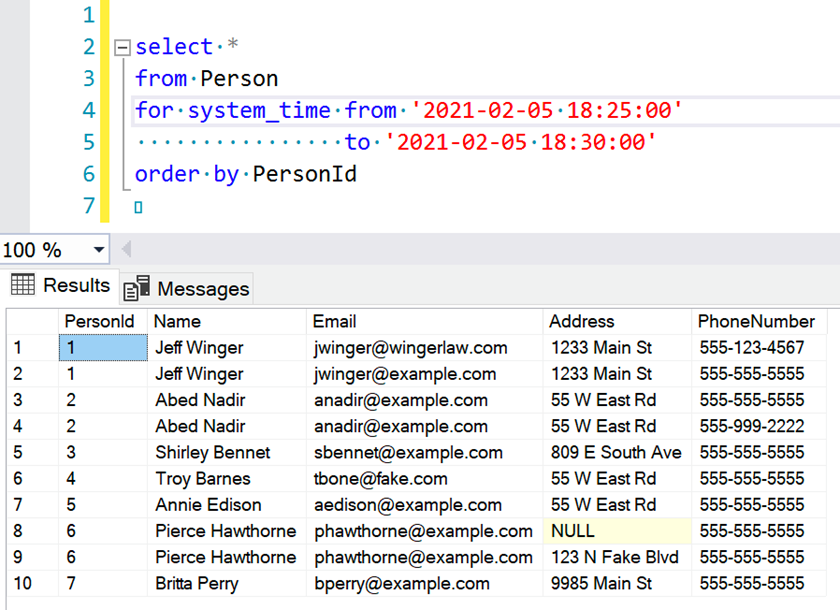
Using the other kinds of clauses, you can view changes to the records over a given period of time. from ... to and between ... and queries will return records that existed during the defined period while contains in ... returns rows that existed only during that period.
select *
from Person
for system_time from '2021-02-05 18:25:00'
                to '2021-02-05 18:30:00'
order by PersonId
Screenshot showing the “from” query and results.
Notice that temporal queries can return multiple records for the same primary key. This can trip up some applications.
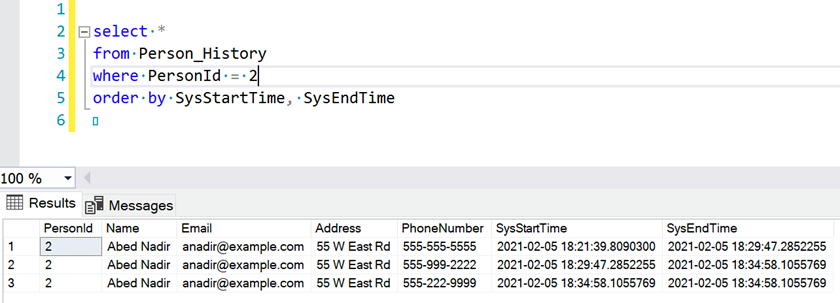
Direct History Access
The history table is as accessible to queries as the main table is (that is, it follows any security rules on the main table). This means you can query the history table like any other table. This is sometimes a useful way to query old versions of records.
Note that the history table only contains old versions of records and not the latest version of each. If you need to include both, use from system_time all on a query of the main table.
select *
from Person_History
where PersonId = 2
order by SysStartTime, SysEndTime
Screenshot showing the history table query and results.
Notice that the history table includes the start and end time columns. Even we have them set to hidden on the main table, they are visible on the history table.
Considerations
The first thing you need to take into account for with temporal tables is the size of your database. Versioning is powerful but takes up more space. There are various solutions that you can implement to control the space used and amount of history kept. My preferred way is to set a limit on the retention period so the history only goes so far back: with (system_versioning = on (history_retention_period = 6 months). This may not be the perfect solution for your application, so read up on ways to control retention and implement the best option for you.
Another consideration is that interacting with versions of records is mostly a manual process. If you want to perform a diff or a rollback, your application must implement those features. SQL Server takes care of the hard part of versioning, which is keeping the history table, but the rest is up to you. Be warned that not all ORM libraries support temporal tables, so how you integrate them into your application will vary depending on your stack.
All in all, temporal tables are a powerful feature of SQL that can take a lot of the pain out of versioning. It may not be perfect in every situation, but when you need to implement history and versioning of data, it can get you started in an easy and straightforward way.
Citations:
“Temporal Tables - SQL Server.” Temporal Tables - SQL Server | Microsoft Docs, docs.microsoft.com/en-us/sql/relational-databases/tables/temporal-tables?view=azuresqldb-current.