Securing API-to-API Azure App Services Using Managed Identity
Donnie Hale | October 25th, 2021

Background
Some application architectures require one API application, deployed as an Azure app service, to invoke endpoints in another API application, also deployed as an Azure app service. In this diagram, the primary API application with core business logic invokes an “integration” API, which abstracts access to other resources.
On a recent project, the “integration” API essentially exposed CRUD (create-read-update-delete) operations to a database that was primarily owned by another application. We didn’t want the core API application to be exposed to that level of detail to the other database, to open connections to it, etc. The core API application invokes endpoints on the integration API to obtain or save data.
Challenge
In such a scenario, the core API application must be exposed over the internet - it’s invoked via REST calls from an application running in users' browsers. Those users must authenticate, and be authorized, before they can make requests to that API. In this scenario, the common solution is to use JWT access tokens generated by the authorization provider for the API “audience”.
The integration API, on the other hand, does not need to be exposed over the internet. It knows nothing of individual users. Yet, we do not want the integration API to be unsecured, such that anyone knowing the domain name can attempt to craft valid requests.
How then do we secure the integration API so that it can only be invoked by the core API application? And how do we secure it in such a way that we’re not writing unnecessary code or inventing our own security model?
Solution
As you would expect, the Azure platform does provide a straightforward solution to this challenge - Managed Identity. Managed Identity capabilities are based on Azure Active Directory (AD). Microsoft itself uses Managed Identity to allow customer applications to securely access Azure services.
In brief, Managed Identity allows you to configure an Azure app service to require authorization based on Azure AD (the integration API in our example) and then to associate an identity with another Azure app service (the core API in our example). That identity allows the core API to meet the authorization requirement configured for the integration API.
Implementation
Three steps are required to implement this solution:
- Configure a Managed Identity for the Core Application
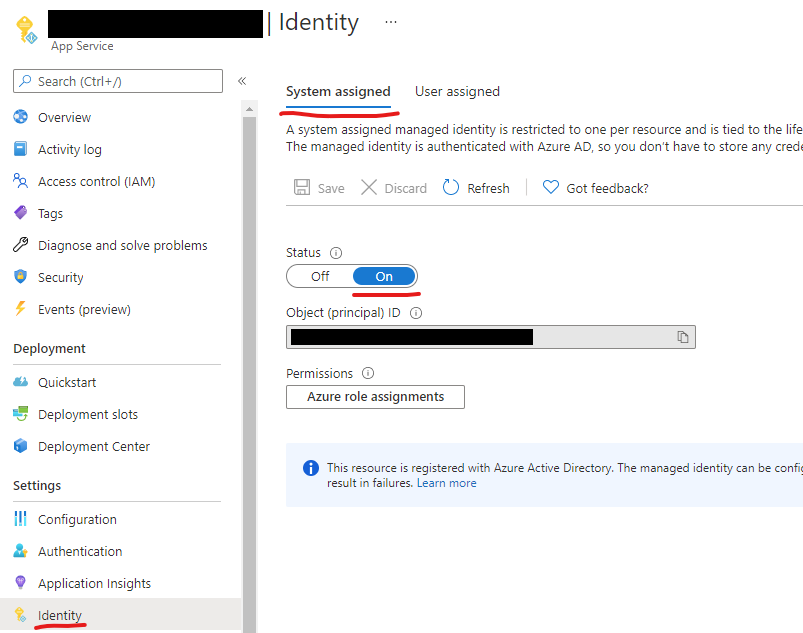
This can be done in the Azure portal. Open the app service and go to the “Identity” blade:
On the “System assigned” tab, slide the “Status” to “On”. This will generate an Azure AD-backed identity that is associated with this Azure app service. This identity will be used behind-the-scenes in step 3 to acquire an access token.
- Configure the Integration Application to Require Azure AD Authorization
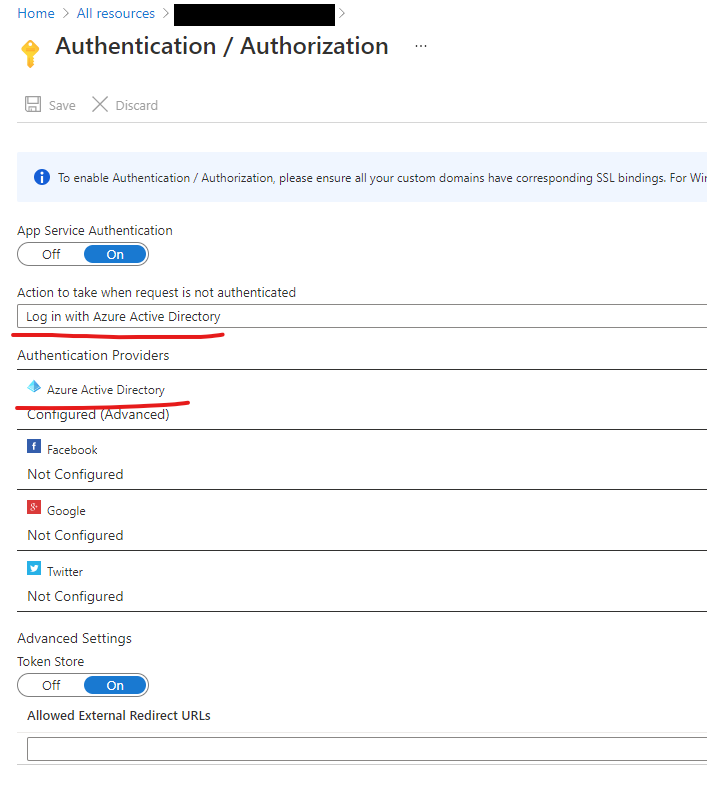
This can also be done in the Azure portal. Open the app service and go to the “Authentication” blade. Note that this image is of the “classic” Authentication / Authorization screen:

Change the “Action to take…” selection from “Allow Anonymous requests” to “Log in with Azure Active Directory”. This ensures that every request must be authorized by the Azure infrastructure hosting the app service before it will allow the request to reach the application.
Then configure the Azure Active Directory provider. If you are configuring this for the first time, it is sufficient to select “Express” on the configuration screen.
Note that no code is required in the integration API to require authorization. Based on this configuration, Azure enforces the authorization.
- Add an Authorization Header with Bearer Access Tokens to the Requests from the Core API
At this point, if you invoked an integration API endpoint from the core API, you would receive a “401 Unauthorized” response. The good news, of course, is if you tried the same using a “curl” command on your workstation (in other words, over the internet), you’d also get a “401 Unauthorized” - which is the goal of this solution.
For the core API to successfully issue requests, it must include an HTTP Authorization header with a valid access token:
Authorization: Bearer <base64-encoded access token>
A short code fragment is used to obtain the access token. This code uses the Azure.Identity SDK. As an example, consider a simple controller endpoint in the core API that must call the integration API to obtain some data:
[HttpGet]
2public async Task<ActionResult<string>> GetAsync([FromQuery] int auth = 1)
3{
4    try
5    {
6        var httpClient = new HttpClient();
7
8        // Allow authorization to be bypassed to compare with/without a valid
9        // access token
10        if (auth == 1)
11        {
12            // Requires the Azure.Identity package
13            //
14            // DefaultAzureCredential will return a credential appropriate to
15            // the environment in which this app is running. For an Azure app
16            // service with a managed identity configured, the credential will
17            // reflect that identity.
18            var azureCredential = new DefaultAzureCredential();
19
20            // The TokenRequestContext specifies the target app for which a
21            // token based on the Azure credential is being requested. Here
22            // it's the integration API app's default scope.
23            var context = new TokenRequestContext(
24                new string[] { "https://your-integrationapi-url.azurewebsites.net/.default" });
25
26            // Azure provides a behind-the-scenes means within the app service
27            // environment to obtain an access token.
28            var token = await azureCredential.GetTokenAsync(context);
29
30            // Specify the access token in the Authorization header
31            httpClient.DefaultRequestHeaders.Authorization = new AuthenticationHeaderValue("Bearer", token.Token);
32        }
33
34        // The actual request to the secured "integration" API
35        var result = await httpClient.GetStringAsync(
36            "https://your-integrationapi-url.azurewebsites.net/integration");
37
38        return Ok($"Call to 'API' succeeded. Response from 'Integration': {result}");
39    }
40    catch (Exception e)
41    {
42        return StatusCode(500, $"Exception: {e.Message}\n\nStack trace:\n{e.StackTrace}");
43    }
44}
In the above code, the core API endpoint takes an optional “auth” parameter so that it can be executed with and without using authorization to invoke the integration API endpoint.
To obtain the access token:
- Instantiate a DefaultAzureCredential object
- Create a TokenRequestContext, specifying the scope for the target service, in this case the integration API
- Invoke the GetTokenAsync method on the DefaultAzureCredential object, passing the TokenRequestContext
- Use the resulting token (token.Token) to form an Authorization header for the request to the integration API
That’s it! When the core API makes requests to the integration API, the core API app service’s managed identity will be used to obtain an access token that is valid for the integration API (based on the specified scope for the context). When the request reaches the integration API, the Azure infrastructure will validate the access token and allow the request to reach the integration API application code. As mentioned, all of that requires no code in the integration API.
In the sample code above, the Authorization header is conditionally passed based on whether a query string parameter named “auth” is passed with a value of 1. This allows you to verify that requests to the integration API receive a “401 Unauthorized” response if the header is not passed in the request.
Additional Considerations
The Microsoft documentation explains that DefaultAzureCredential and its GetTokenAsync method behind the scenes use an endpoint available within the app service (e.g., “localhost”) to generate the access token based on the app service’s identity and the desired context.
Given that this is a relatively expensive operation, and given the fact that the access tokens have a lifetime, you should consider caching the access tokens for a period of time so that they don’t have to be generated on every request to the integration API.
In our production application, we’re using LazyCache, which is built atop of Microsoft’s MemoryCache.
Reference Articles
These articles were the primary basis for this approach:
https://marczak.io/posts/2019/07/securing-websites-with-msi/
Other helpful articles and resources:
https://docs.microsoft.com/en-us/azure/active-directory/managed-identities-azure-resources/overview
https://github.com/Azure/azure-sdk-for-net/blob/master/sdk/identity/Azure.Identity/README.md
https://docs.microsoft.com/en-us/azure/app-service/overview-managed-identity?tabs=dotnet
https://www.rahulpnath.com/blog/defaultazurecredential-from-azure-sdk/